Transferring voice message files using VOIP-500/600 Call Stations
Issue:
Need to transfer or download voice message files from VOIP-500 or VOIP-600 Call Stations
Environment:
VOIP-500 or VOIP-600 Call Stations
Resolution:
Here are the steps:
Things you will need:
• Network access to the VOIP-500/600 call station
• Guard/Programming access to the VOIP-500 devices - Default is *4**
• Putty application (Free) - https://www.chiark.greenend.org.uk/~sgtatham/putty/latest.html
• WinSCP (Free) - https://winscp.net/eng/download.php
STEPS:
1. If you have already recorded the first greeting on the VOIP-500, skip to step #5.
2. Dial into and log into the VOIP-500
3. Record greetings on the first device. *91*1* (Refer to page 58 for full instructions on recording messages)
4. To preview the recording, dial *92*1* to hear the message you recorded.
5. Once recorded, log onto the VOIP-500 call station using the GUI Web application
6. On the web application, navigate to the Authentication tab on the left.
a.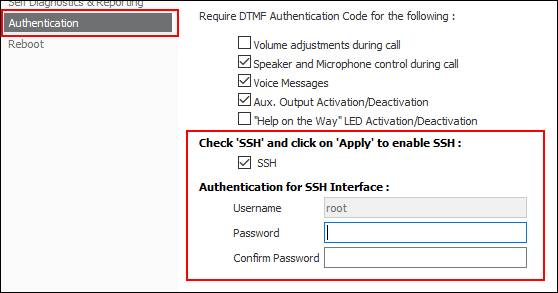
7. Ensure the SSH check box is checked and give the root login a password of your choice. Click Apply.
8. Using PuTTY Log into the VOIP call station with the IP address of the VOIP device, login of root and the password you assigned. You should be at a root:~> prompt.
9. Type cd flash
10. Type ls
11. You should see something similar to this (NOTE: NOTICE THE voice_message_1.711a file.
a.
12. Open WinSCP
13. Connect to the VOIP-500 device using SCP protocol and the same login credentials as above
a.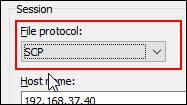
14. Once logged into the device, you should see a similar screen as below:
a.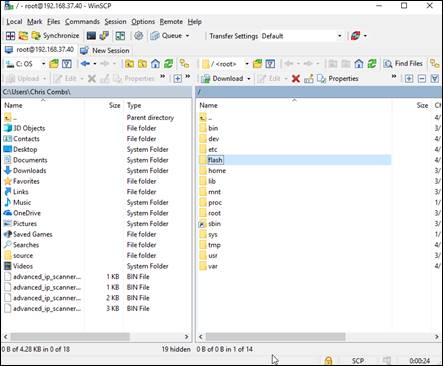
15. In the Right window pane, double click on the flash directory. You should see the voice message. (See below)
a.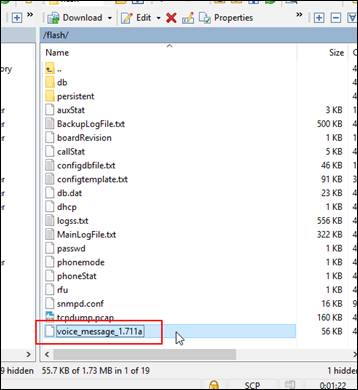
16. Now, you can drag and drop that file onto your desktop of your computer.
17. Once it is on your computer, simply go through steps 11-12 outlined above to connect to the other devices that need the voice message file.
18. From your desktop, drag the file from your desktop to the flash folder of the VOIP-500 device.
19. Right click on the RIGHT window pane in WinScp and click Refresh to see if the file exists.
20. If file exists, reboot the VOIP-500 device using the Reboot tab (Apply to activate the reboot)
21. Once VOIP-500 is back online dial into the VOIP-500 and then listen to voice message by dialing *92*1*
22. Once validated, Set the recording configuration on the Voice Messages tab as you normally would and test by pushing the call button and verify it is being played based on your configuration that you have set.
If the steps above fail or you have issues with the devices, please give us a call at 773-539-1100 and select Technical Support. You can also email us at support@talkaphone.com
Related Articles
How to do a packet capture on the VOIP-500/VOIP-600 Series IP Call Stations using tcpdump?
1. Login to the VOIP-500/VOIP-600 Call Station console either by using a Serial cable or through SSH. 2. Navigate to the /flash directory- root:/> cd /flash 3. Run the command to start capturing packets- root:/flash> tcpdump -w call1.pcap ...VOIP-500 and VOIP-600 Installation Guide
Call Station Installation Guide for Model VOIP-500 and Model VOIP-600 To jump to the INSTALLATION Steps, use the Table of Contents links. Overview and Intended Audience This guide provides detailed instructions for the configuration and operation of ...How to find out the IP Address acquired by the VOIP-500/VOIP-600 IP Call Stations from the DHCP server using Serial connection?
Requirements: Serial connection to the VOIP-500 or VOIP-600 FTP server that supports receiving files via ftpput. Filezilla will support this Power supply or POE switch Network connection to VOIP-500 or VOIP-600. Procedure: 1. Connect a ...How To Install the AVM-1 and the VOIP-20X (with IP Camera) - Peer To Peer
This knowledge article describes the setup of the AVM-1 and the VOIP-20X (With IP Camera) in a peer-to-peer environment: Assumptions: Technician has fundamental knowledge in computer networking and Voice over Internet Protocol (VoIP) technologies is ...How To Install the AVM-1 (GXV3275) and the VOIP-500 or VOIP-600 (with IP Camera) - Peer To Peer
This knowledge article describes the setup of the AVM-1 and the VOIP-500 or VOIP-600 (With IP Camera) in a peer-to-peer environment: Assumptions: Technician has fundamental knowledge in computer networking and Voice over Internet Protocol (VoIP) ...